Your Fleet
Everything in this chapter lives under Fleet in the left navigation: Vehicles, Map, Calendar, and Breadcrumbs. The same section also holds Maintenance, Diagnostics, Trackers, and Service providers, which are covered in their own chapters.
The vehicle register
Fleet → Vehicles is the master list of every car you operate. Each row shows the plate, VIN, make and model, current status (available or on a trip), whether a GPS tracker is attached, and the last known odometer reading. The counters at the top of the page give you the totals at a glance: how many vehicles you have, how many are tracked, and how many are available right now. A search box filters by plate, VIN, make, or model.
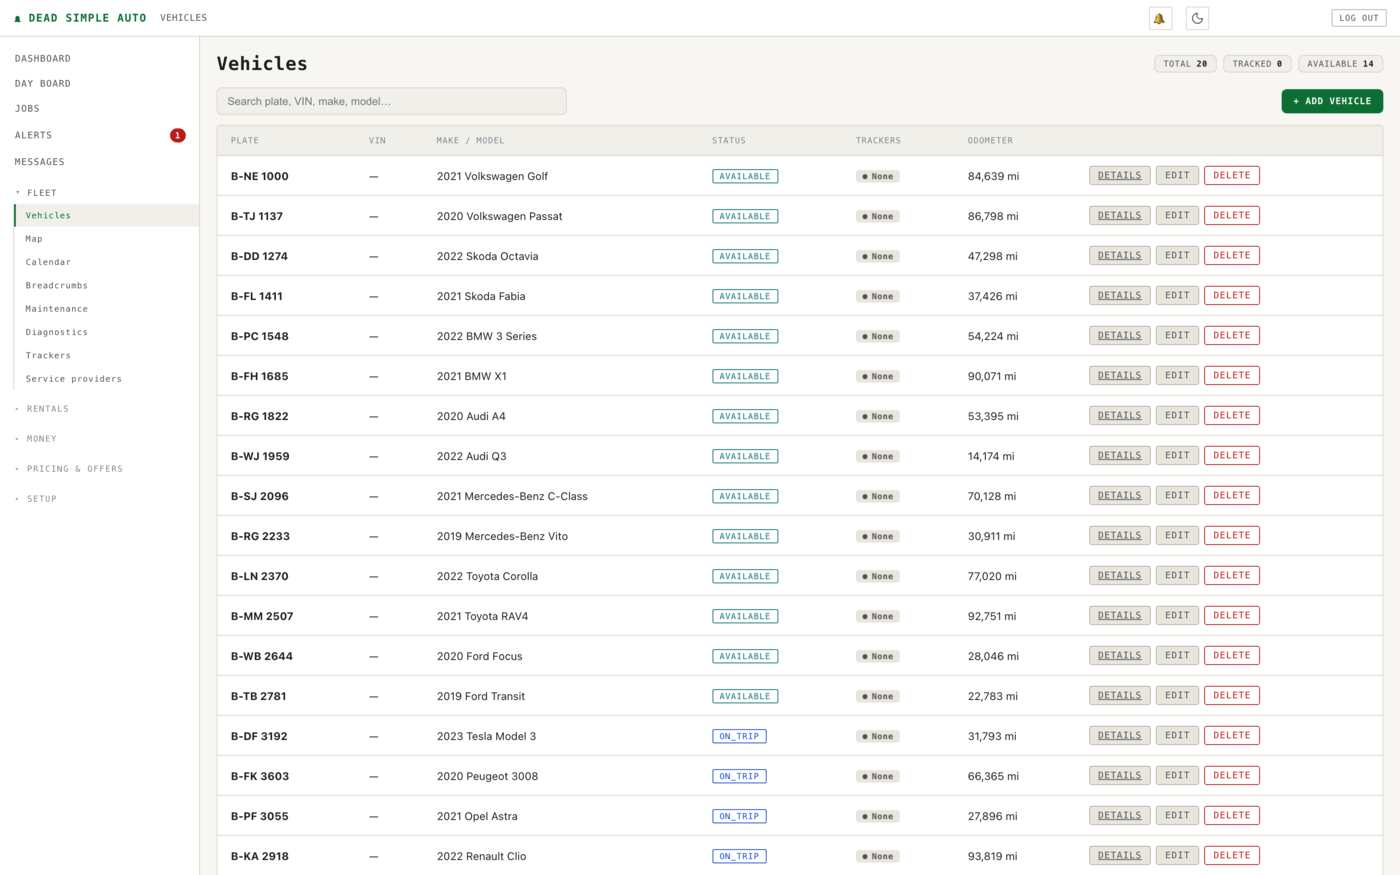
Click + Add Vehicle to register a car. The plate is the only required field; the rest — VIN, year, make, model, trim, color, daily rate, odometer, fuel type, transmission — you fill in as you know it. The same form assigns GPS trackers (up to three per car) and controls whether the car is listed on your booking portal. The vehicle photo, registration, and insurance documents are attached by editing the vehicle once it exists. From each row, Details opens the vehicle’s page, Edit changes its record, and Delete removes it.
Note: VINs and internal vehicle codes are unique within your organization. If you try to register a car twice, the software refuses rather than silently creating a duplicate.
The vehicle detail page
Every car gets its own page. The header shows the essentials — plate, make and model, status, VIN, color, odometer, and daily rate — alongside the vehicle photo (or a placeholder until you add one). If no GPS tracker is attached, a banner says so plainly and offers a Register Tracker button.
Below the header, a mini-map draws the last 24 hours of GPS trail, with a point count and a last-updated time, and telemetry tiles show speed, fuel, battery, and RPM. Tiles with nothing to report show a dash instead of a made-up number. A panel to the right shows the current rental, or states that the vehicle is not rented and is available to assign.
Below that, tabs collect the vehicle’s history in one place: Rental History, Maintenance, Service & Body, Stats, Geofence, and Financials. This is the vehicle’s timeline — every rental, maintenance job, service visit, and expense that touched this car, without hunting through separate lists. The rental history table shows each rental’s customer, dates, status, total, and where it came from (manual entry, the booking portal, or an import).

The live map
Fleet → Map puts every tracked car on one map. The panel on the left lists the fleet with a status chip per car — available, on a trip, or offline — and the map shows each vehicle as a marker labeled with its plate. Click a vehicle in the list or on the map and the panel on the right fills with its details: status, driver, position, speed, and when the position was last updated, plus shortcuts to the vehicle page, the driver, the trip log, and the killswitch.
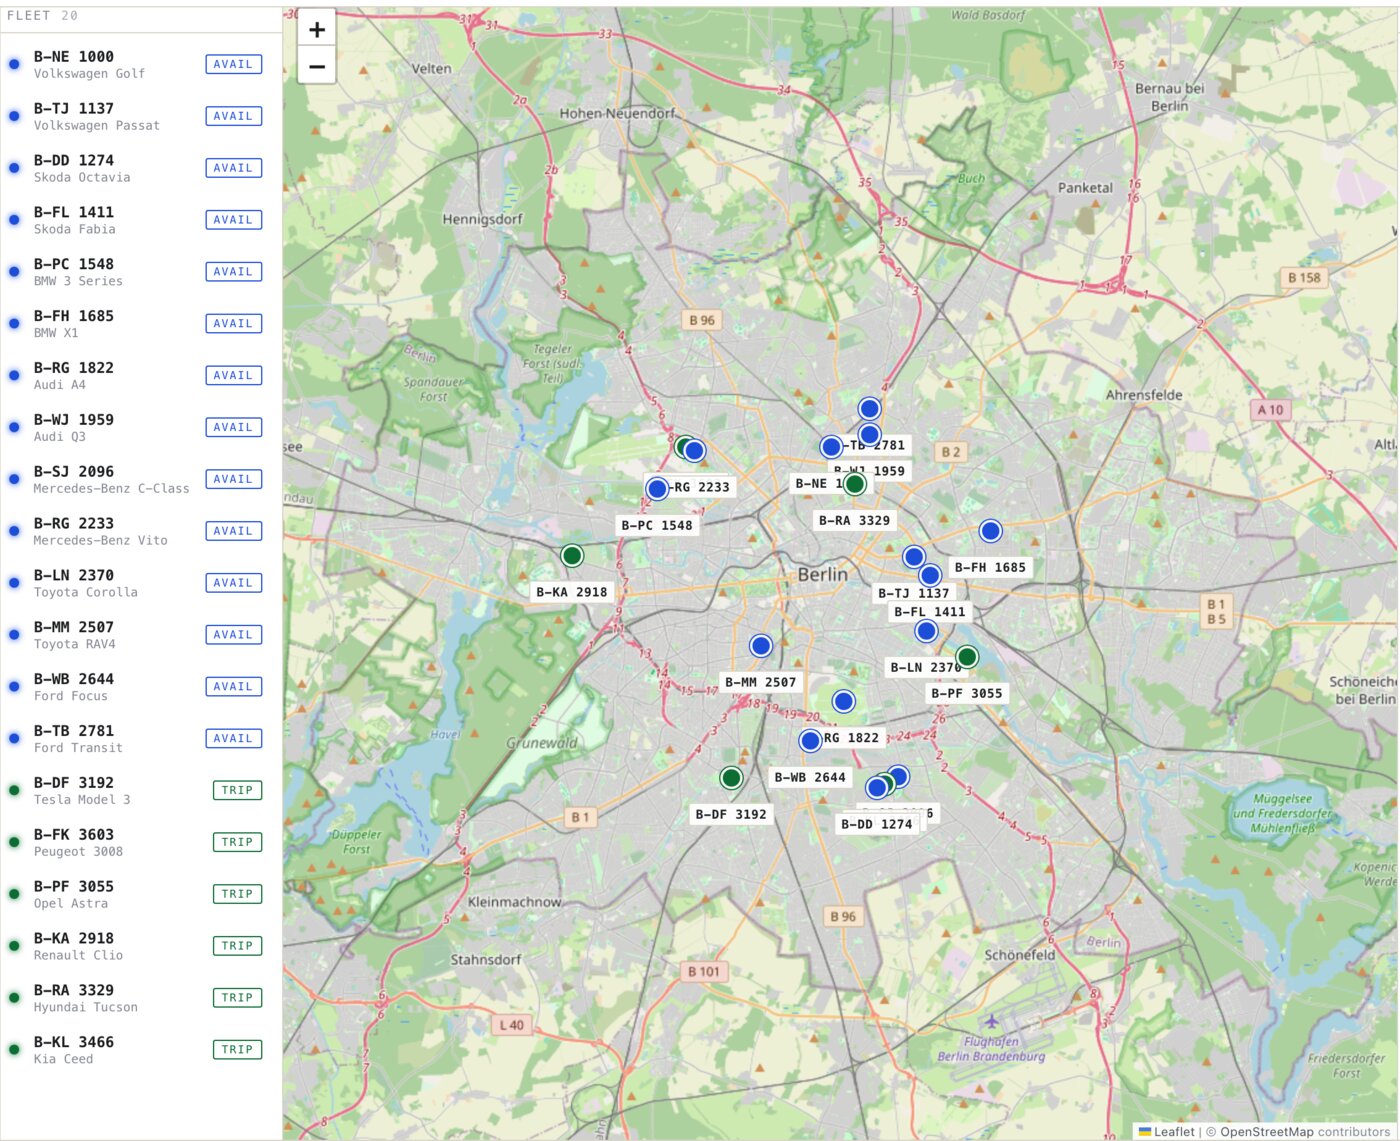
Note: A car without a tracker has no position to show — the fleet count at the top of the list calls out how many cars are missing one. The map reports what the trackers report; nothing is interpolated or guessed.
Breadcrumbs
Fleet → Breadcrumbs shows where one vehicle actually went. Pick a vehicle, set a from/to time window, and press Show. The route draws on the map from a green start marker to a red end marker, and four tiles summarize the window: how many GPS points, the distance covered, the duration, and the maximum speed. A Route/Playback toggle switches between the drawn trail and a replay, and a 24h clock toggle sets the time format.
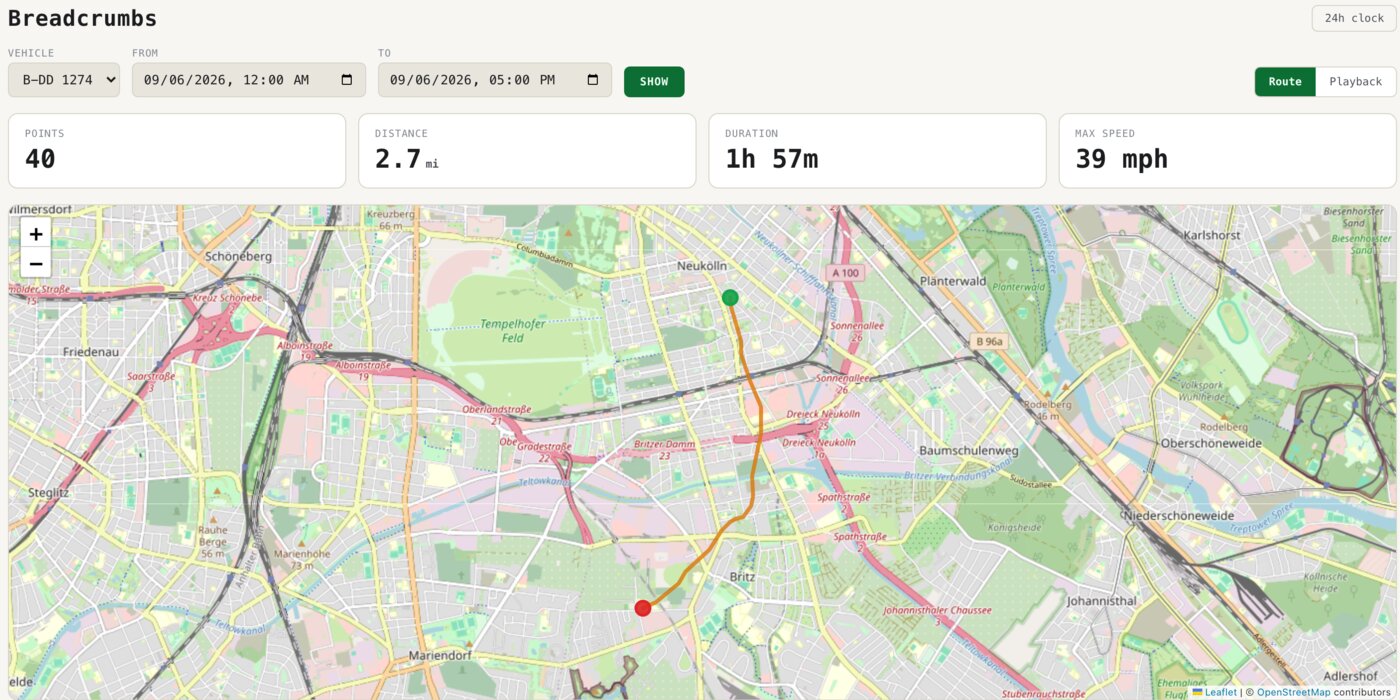
This is the page to open when a renter disputes where the car was, or when a toll charge doesn’t look right — the same trails feed the toll auditor (see the Money chapter).
The fleet calendar
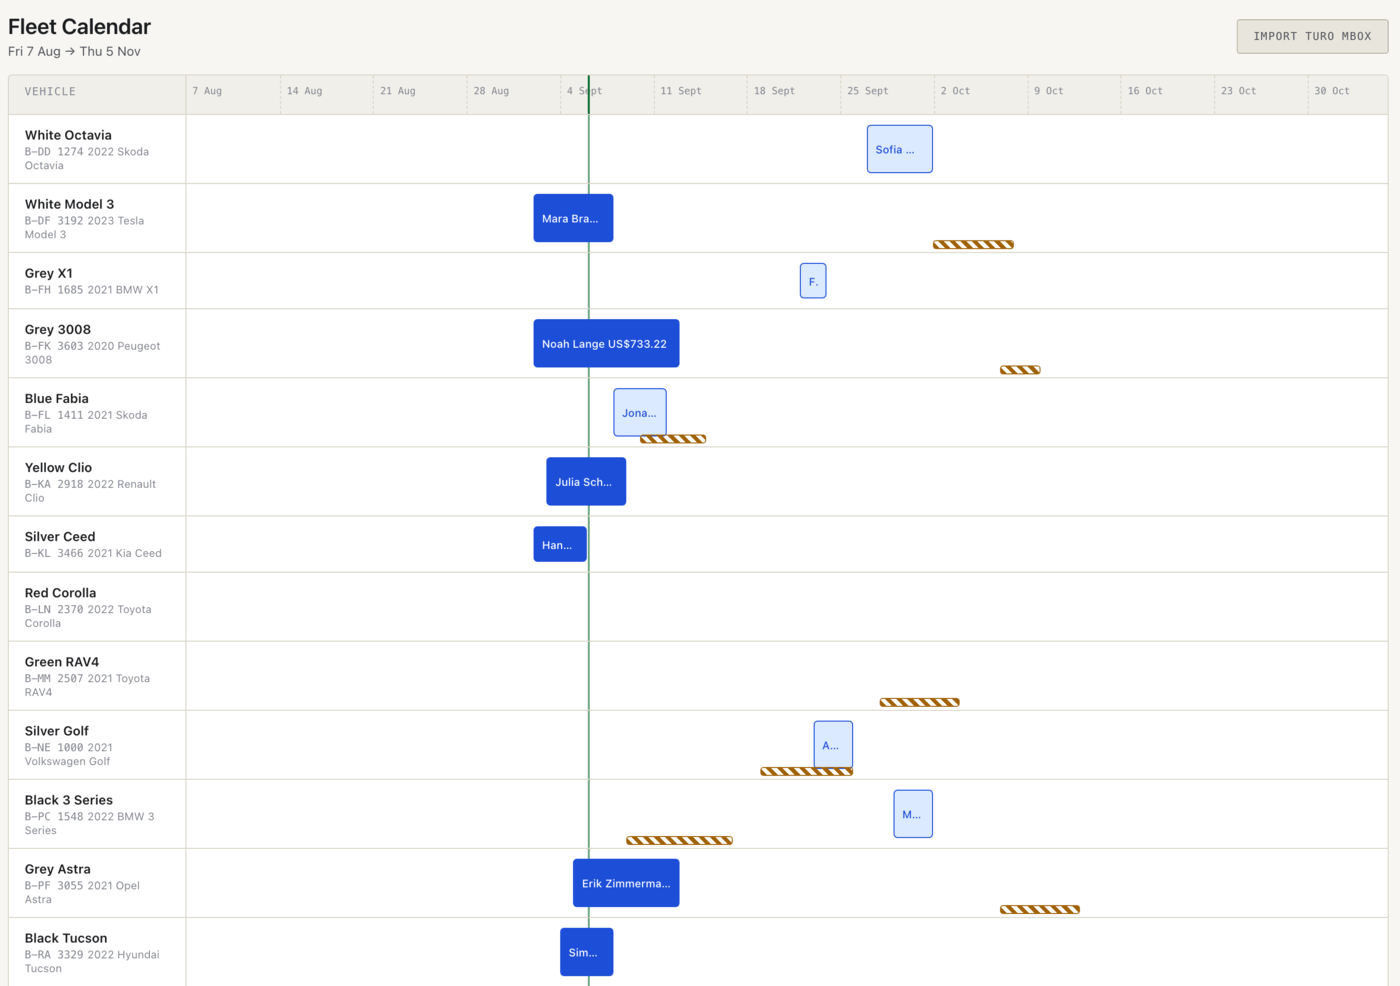
Fleet → Calendar lays every vehicle’s schedule on one timeline, one row per car, with a vertical line marking today. Rentals appear as bars carrying the customer’s name — solid for rentals in progress, lighter outlined for reservations still ahead, and bookings imported from Turo wear a small T tag. Pending holds — booking requests you haven’t approved yet — draw as a thin striped band along the bottom of the row, so a request that overlaps a confirmed rental is visible before it becomes a problem; clicking a hold jumps to your booking inbox. Blackouts appear as gold-striped blocks (more on those below). The Import Turo mbox button on this page pulls your Turo bookings into the same view.
Blackouts
A blackout takes a car off sale. When you black out a vehicle for a date range — because it is in the body shop, being sold, or you just don’t want it rented — it is removed from every booking surface at once: the direct booking portal, fleet search, the embeddable widget, and staff-created rentals all go through the same availability check. There is no surface that forgets. You manage blackouts from the vehicle’s own page, and they appear on the fleet calendar as striped blocks — click one to remove it. Maintenance jobs can create and clear blackouts automatically if you opt in, so a scheduled repair blocks the dates without you doing it twice. If an existing booking collides with a new blackout, an alert tells you, and it clears itself when the conflict does.
The document vault
Each vehicle’s page carries a document vault for the paperwork that expires: insurance, registration, inspections. Upload a photo or PDF and vision OCR reads it, transcribes it, and auto-fills the expiry date from the document itself — you confirm rather than retype. When an expiry approaches, an alert appears in Alerts, so a lapsed inspection surfaces before a renter or a roadside check finds it first. Documents are searchable by their extracted text, which is how you find “the green card for the Passat” six months later.
Note: OCR extraction is a draft, not a verdict. Check the auto-filled expiry date against the document before you rely on it — the software fills the field, but the date on the paper is the one that counts.